Martha+Tom

A Pine Tree for Christmas

Christmas ornaments up close

At the end of November, Remodelista featured the Filigrantrae, a Danish wooden Christmas tree that can be used year after year. I was taken, but the marthaandtom production budget didn’t exactly have $275 floating around with which to fulfill all our Scandinavian holiday fantasies.

Almost immediately after seeing the images on Remodelista and then Design Public, a little idea floated into my head… I could make this myself. A typical I-could-make-that feeling turns into “I could make it, I just didn’t” …but not this time.

With the aid of a math problem made Facebook status, I developed a plan, helped along by Emma’s Designblogg‘s sharing of a series of photographs originally from Bolig Magazine of a Danish family’s home with one of these babies in every room (at $275, you bet they come in multiple colors: rødt, lime, sort, hvidt, and lilla). This was the final inspiration I needed.

With only hours left before snow would seal us in our apartment for the foreseeable future, we made a mad dash for Home Depot on Friday night. While everyone else was stocking up on snowblowers and shovels, Tom and I were shopping lumber. At $26.86 before tax – power-sawing included – we were off to a good start.

dowels and pieces of wood on a cart

homemade Danish reusable Christmas tree

As of yesterday evening, we now have a fully-decorated tree that can be used again and again.

Before you head to your local lumberyard to buy out their dowel supply, I would share that this wasn’t as easy as I thought it would be. I have a renewed understanding of what it means to have the right tools for the job and a steadier hand with a drill. With all of the mistakes that went into this one, I was very tempted yesterday to throw out the central pole and begin again (I bought different drill bits midway through the project almost doubling the total cost. But at less than $50, I’m still not complaining).

While it’s not perfect, I’m taking the suggestion of my father (who I must thank for his willing participation in a video-chat planning session on Saturday) and living with all the character of this first attempt. With no further work in store, I finished just in time for my self-imposed deadline of December 15, the night before my family’s tradition of reading the Novena de Aguinaldo is to begin.

The Ingredients:

  • Four ½” round pine dowels, each 48″ in length cut into twelve sections in varying sizes*
  • One 5′ pine closet pole**
  • One tapped ¼-20 wood insert
  • One bolt to fit the above insert (mine was about 2.5″ long)
  • One pine 1×4 cut to lengths of 16.5″ (2 pieces) and 4″ (two pieces)
  • Wood Glue (you’ll need screws and/or wood clamps to get a tight seal)
  • Sandpaper
  • Drill (ours is cordless) with the following drill bits:
  1. Wood specific*** bit (for drilling into the center pole)
  2. A smaller but not too small bit for creating pilot holes before using the ½” bit
  3. ¼” bit (to create holes in the base and central pole for the bolt
  4. â…œ” bit (to create a hole in the central pole for the wood insert)

Don’t forget wood scraps for practice if you’re less-than-handy with your drill. I bought a 1′ section of a closet pole in addition to the 5′ central pole of the tree to practice making ½” holes and kept the extras from the 1×4 to prevent my drill from going through our living room floor.

All measurements included are approximations based on studying pictures and descriptions of the original Danish design. If you plan to make your own, don’t worry about sticking too carefully to the exact specifications listed here. Note also that the original design uses birch, which is no doubt much easier to obtain in northern Europe than in a big box wood retailer in the midwestern United States, where pine is widely available for a very low cost.

Notes & Tips

*My plan called for 1×4″, 3×6″, 2×10″, 2×16″, 3×20″, 1×18″, 1×26″.

** The original design has an angled cut at the top… I forgot to request this of the staff at Home Depot. This is probably best done with a handsaw at home, though.

***Using drill bits not made specifically for wood working may result in much less than perfect drilling. For best results, DO NOT use a flat bit, even if it is specified for use on wood. I used this brand and was able to buy a single ½” bit at the hardware store. For help getting to know your drill, click over to Design*Sponge’s new feature on building your toolbox.

21 comments

Going Places with Food

Eating local food when it is in season – elitist though it may be – is a good trend for food in America, one that I hope has more staying power than most foodie fads. To that end, I try my best to try to promote that style of eating, on this blog and in my life. Farmers markets, winter squash recipes, pickling – all are inspired by the desire to enjoy the unique fruits of Minnesota. But sometimes I worry that this parochial focus threatens to cut us off from one of the greatest joys of eating: food’s ability to transport us to a place far away from home – for a fraction of the cost of air-fare.

Yesterday in Minneapolis was one of those days when one might have wanted to be somewhere else. Seventeen inches of snow in the space of a day can make you question your choice of the latitude you inhabit. Actually, the snow was pretty enough to watch if you didn’t have to drive anywhere – a situation Martha and I thought we were in until we realized our car was parked on the wrong side of the street. An hour, many shovel-loads of snow, and several good samaritans later we had the car parked safely out of the way of plows and were back inside for the rest of the day, hanging our clothes up to dry and thinking about the joys and challenges of living in the Great White North.

But as we had breakfast in the morning, leisurely eating arepas individually buttered, salted, and topped with cheese, we might as well have been in Cali, Colombia, enjoying the morning hours before the day’s heat and afternoon rains arrived. Martha’s Aunt Stella would wake us each morning with these freshly-grilled corn cakes as well as orange juice and coffee. After taking our time over breakfast it was just a short walk to Uncle Joaquín’s café – attached to the house – for a tinto and conversation with the regulars. In Minnesota yesterday morning our orange juice didn’t taste quite as fresh, and the coffee could be better (we love our Peace Coffee but you can’t beat coffee right from the source) but the taste of lightly fried arepas made the snow seem remote, something we were reading about in El Tiempo rather than something rapidly burying our car in a small white mountain.

We make arepas with Masarepa blanca that we hand-imported from Colombia but that is also available in all the Hispanic grocery stores in Minneapolis and can be ordered online. I just follow the package instructions: mix a cup of masarepa with one and a quarter cups of water and salt to taste, let the mix rest a few minutes, and then form ping-pong ball-sized balls into flat patties with very wet hands to prevent sticking (I use a side bowl of water to keep my hands hydrated). Tradition calls for these to be cooked on a parilla, a device for cooking them directly over a gas flame, but I have better luck using a non-stick skillet instead – the arepas stay together, brown more evenly, and can be cooked more than one at a time.

After spending our morning in Cali and much of our afternoon in the harsh reality of Minnesota, by evening we were ready to take another trip. Black beans and white rice is a dish enjoyed throughout the world, especially in Latin America, but for me it’s something I associate most with Cuba. Since the snow shut down most of the grocery stores early we had to rely on the supplies already in the house. Delving deep into the freezer produced a ham hock, which when combined with dried black beans, a bay leaf, half an onion, salt and water and left to cook for a few hours before being spooned over white rice makes a satisfying meal whether you’re at 45 or 23 degrees north. It never snows in Havana, so how could it be snowing when you’re enjoying soupy black beans and rice?

2 comments | , , , ,

From the Pantry

Spending last weekend out of town was great fun for Martha and me, but it seriously interrupted our usual weekend meal planning and grocery shopping routine. When we returned home on Sunday night, I was scrambling for ideas for what to put on the table. Rather than spend a precious weeknight writing a menu and grocery shopping, I decided to wing it for the week and try to use up some of the food we already had in the house. Yeah, I know, cooking from the pantry, not really something to write home – or write blog – about, but a couple of these dishes came out well enough that I thought I’d post them here, just in case someone else out there finds themselves stuck with the exact same ingredients.

1990s Pasta

Forgive me if I’m mixing up decades here, but it seems like the 90s was the time when we everyone was eating sun-dried tomatoes, balsamic vinegar, arugula and penne. Well, as it happens Martha and I keep all these things on hand. One thing I wish we kept on hand that we don’t is pine nuts, which would have been great in this and also very in keeping with that 90s theme. The vinegar was a last second edition when I saw how muddy the tomato liquid was going to make the pasta look; it brightened the flavors up nicely.

  • ½ cup sun-dried tomatoes (the dry kind, not the kind packed in oil)
  • 3 garlic cloves, shaved thin on a mandoline
  • ¼ tsp red pepper flakes
  • 1 Tbsp olive oil
  • About half a bag of baby arugula (4 or 5 cups, maybe)
  • 1 14oz can cannellini beans, drained and rinsed
  • ½ cup chicken stock
  • Salt and pepper
  • 1# penne
  • 1 Tbsp balsamic vinegar
  • ¼ cup grated parmesan cheese

Cover the tomatoes in 2 cups of boiling water and allow to soak 15 minutes, until slightly rehydrated and tender. Strain the tomato soaking liquid into a small saucepan and reserve tomatoes. Bring tomato liquid to a boil and allow to reduce by half. Set aside.

Bring enough water to cook the pasta to a boil in a large stockpot. Place garlic slices, pepper flakes and olive oil in a large, cold skillet and heat over medium heat until garlic cloves brown. Stir in arugula and allow to wilt. Add tomatoes, beans, reduced tomato soaking liquid and chicken stock to skillet and bring to simmer. Season to taste with salt and pepper.

Meanwhile, cook the penne al dente and drain. Return to stockpot and toss with sauce, vinegar and cheese. Serve, topping with additional cheese as desired.

Moroccan Parsnips

I’m not sure if they grow parsnips in Morocco, but we sure do grow them in Minnesota, and for some reason I’m always 1.) buying tons of them and 2.) putting them into bland, earthy concoctions. So I turned to a warmer, spicier place to help get through this lingering late farmers market staple.

  • 1 Tbsp olive oil
  • 1 small bunch parsnips, peeled and cut into 3″ long, thin pieces
  • 1 small onion, sliced thin
  • 2 cloves garlic, minced
  • 1/8 tsp cinnamon
  • ¼ tsp cayenne
  • ¼ tsp paprika
  • ½ tsp cumin
  • ½ tsp coriander
  • 1 ½ tsp salt
  • ½ cup chicken stock
  • 1 14oz can chickpeas
  • ½ tsp zest plus ¼ cup juice from one orange
  • 1 tsp white vinegar
  • 1 tsp harissa
  • ¼ cup minced parsley

Heat olive oil in large skillet over medium-high heat. Add parsnips and allow to brown. Stir, browning on other sides. Transfer parsnips to a bowl and set aside.

Return skillet to medium heat. Add onions and cook until edges start to brown. Add garlic, spices and salt and cook until fragrant, just a few seconds. Add chicken stock, chickpeas, parsnips and orange zest along with enough water to half cover the parsnips. Partially cover the skillet and simmer until the parsnips are completely tender – about 15 minutes for me, but it depends on the age and toughness of the parsnips.

When parsnips are ready, turn off the heat and stir in the harissa, orange juice, vinegar and parsley. Taste for seasoning. Serve with cous cous.

2 comments | , , , , , ,

Thanksgiving Favorites

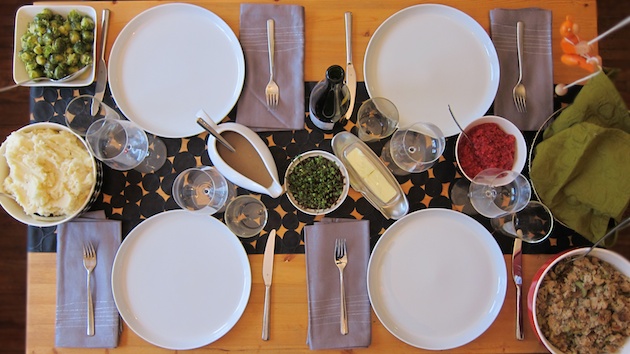
Thanksgiving Table

Was it the stuffing? The mashed potatoes? No. I’ve realized my favorite parts of Thanksgiving are not so specific as one dish on the table. As Tom and I begin to establish our own Thanksgiving traditions, I’ve become attached to many of them. This was our firstofficialthanksgivingasamarriedcouple and we were lucky to enjoy it with two great friends, Mary and Brett. Perhaps obvious, my number one favorite part of Thanksgiving is setting the table, just as last year. This year we also repeated the practice of serving a relish plate full of homemade pickles in the living room before dinner. Standouts were Tom’s pickled okra and Brett’s pickled chanterelles. A few of us also ended up with a black olive on the end of each finger for fun. The best part of Thanksgiving hors d’oeuvres, though, is most certainly Tom’s turkey liver pâté. I want to eat this all-winter-long… so if you have any spare turkey livers in the back of your fridge, you know where to abandon them–on our doorstep. Number four, well, the TURKEY. Tom’s method of roasting the breasts and separately preparing turkey legs and thighs confit continues to delight. And lastly, but not leastly, it is every little bite each a combination of the plate before me, that serves to make Thanksgiving a special meal. Each dish broken down into discrete, distinct mouthfuls is what makes this dinner Thanksgiving, to me.

4 comments | , , , , , , , , , , , , , , , ,

Adams, Minnesota

Adams, Minnesota Wind Farm

a man stands in front of a windmill's base and waves, as if he were the president getting out of Air Force One a man stands at the base of a windmill in Minnesota

Tom's Silhouette at Sunset

a couple on a windfarm a couple at sunset on a windfarm

machine shed at sunset

machine shed

detail of the machine shed at sunset

Sunset at the Machine Shed

rust

silhouetted man against the sunset on a glacier rock

Happy 3-week anniversary, Hailey & Dave!

3 comments | , ,

« Older Entries Newer Entries »